Search This Blog

Thursday 25 July 2013

Android Action Bar backward compatibility support in lower version of android O.S

While following android design patterns, Action bar is an important factor in it. Unfortunately Action bar was not supported in lower version than 3.0. Which was very painful for developer because still android 2.3.3 has fair amount of share in android market. So developers were forced to use Sherlock ActionBar and others
But Good news is , we no more need to rely on third party library for support of Action Bar in lower version from July 2013.
Google Android has provided their native support for backward android version as part of new latest update.
Even Though i  have not gone through this API but seems very very helpful.

Android Support Library, revision 18 (July 2013)


This library will remove the developer pain of Action bar support. I feels that because of its limited support developer can not use Action Bar in latest version also. As using Action Bar and third party Action Bar was very hectic and it lead to great effort with no good result.
Upto now We should thank Sherlock Actionbar. They made one excellent productive library

Soon i am going to post of using this library in our own application. 

New features in Android 4.3 Jelly Bean for developer perspective

Yesterday the most awaited update goes on public of android Jelly bean. Everyone was anticipating new update from Google android. Even next version Key Pie Lime also seems to be in Queue. But having this strong update helps a lot for developer and end of day to user
Lets have a look on some new  feature

Faster smoother and More Responsive
Every android update start from this. But really google worked hard to improve the responsiveness of android which already very good. Actual effect will be realize after update only.  Google says Android 3.0 build on a performance improvement included in Jelly Bean - Vsync timing, triple buffering and reduce latency, CPU input boost. 
4.3 improved windows buffer allocation which result in faster image buffer allocation and reduce time in rendering 

Your application May misbehave 
if your app uses implicit intents..
  Because of restricted profile update environment, your application may mis behave so go to android     developer to make it correct.
if your app depends on accounts for the same above reason


Restricted Profile environment 
Any accounts added to the primary user are available to a restricted profile, but the accounts are not accessible from the Account Manager APIs by default. If you attempt to add an account with Account Manager while in a restricted profile, you will get a failure result

Wireless and Connectivity Update
4.3 version allow many wireless and connectivity updates. Android now supports Bluetooth Blow Energy with new API. Wifi Scan only mode allow user to obtain correct location without draining 
battery.


Multimedia Updates

MediaExtractor and MediaCodec has been enhance on great level to support developer. Media DRM is another update from android 4.3 Jelly Bean. Video encoding from a surface  are the topic need to be explore by android developer

Some User interface has been added like ViewGroupOver and Optical bound layout. Some screen orientation has been added. TV scan support are excellent now. Improved support of accessibility services and Notification manager

Some new language are added in localization like Hindi etc

Reference for Information and Images


Monday 22 July 2013

Sound Pool Tutorial in Android : changing pitch of an sound file

SoundPool provide a frequency range to change the pitch of voice. This tutorial address the sound pool features. After reading this tutorial you will be able to answer these question

1) What is soundPool?
2) Why we use it?
3) How to change pitch of sound file through frequency?

How to prepare a simple sound Pool?


Sound Pool : A SoundPool is a collection of samples that can be loaded into memory from a resource inside the APK or from a file in the file system. The SoundPool library uses the MediaPlayer service to decode the audio into a raw 16-bit PCM mono or stereo stream. This allows applications to ship with compressed streams without having to suffer the CPU load and latency of decompressing during playback.

Creating simple sound pool with one sound file. Keep your sound file inside raw folder

SoundPool soundPool = new SoundPool(50, AudioManager.STREAM_MUSIC, 0);

50 is the number of repeat cycle, 0 is srcquality

Now load one sound file and wait until load finish using OnLoadCompleteListener.

        /** Sound ID for Later handling of sound pool **/
        soundId = soundPool.load(this, R.raw.sounds, 1);
        soundPool.setOnLoadCompleteListener(new OnLoadCompleteListener() {
            @Override
            public void onLoadComplete(SoundPool arg0, int arg1, int arg2) {
                streamId = soundPool.play(soundId, 1, 1, 1, 3, pitch);
                soundPool.setLoop(streamId, -1);
                Log.e("TAG", String.valueOf(streamId));
            }
        });

This tutorial has two button two increase and decrease frequency rate. Just See the complete code

XML


<RelativeLayout xmlns:android="http://schemas.android.com/apk/res/android"
    xmlns:tools="http://schemas.android.com/tools"
    android:layout_width="match_parent"
    android:layout_height="match_parent"
    tools:context=".PitchActivity" >

    <TextView
        android:id="@+id/textView1"
        android:layout_width="wrap_content"
        android:layout_height="wrap_content"
        android:layout_marginLeft="147dp"
        android:text="@string/hello_world" />

    <Button
        android:id="@+id/plus"
        android:layout_width="wrap_content"
        android:layout_height="wrap_content"
        android:layout_below="@+id/textView1"
        android:layout_marginLeft="147dp"
        android:layout_marginTop="35dp"
        android:text="+" />

    <Button
        android:id="@+id/minus"
        android:layout_width="wrap_content"
        android:layout_height="wrap_content"
        android:layout_alignRight="@+id/plus"
        android:layout_below="@+id/plus"
        android:layout_marginTop="41dp"
        android:text="-" />

</RelativeLayout>

Activity


package com.pitch;

import android.app.Activity;
import android.media.AudioManager;
import android.media.SoundPool;
import android.media.SoundPool.OnLoadCompleteListener;
import android.os.Bundle;
import android.util.Log;
import android.view.View;
import android.view.View.OnClickListener;
import android.widget.TextView;

public class PitchActivity extends Activity implements OnClickListener {
    TextView mtxView;
    SoundPool soundPool;

    @Override
    protected void onCreate(Bundle savedInstanceState) {
        super.onCreate(savedInstanceState);
        setContentView(R.layout.activity_pitch);
        mtxView = (TextView) findViewById(R.id.textView1);
        mtxView.setText("Current Pitch=0.5");
        findViewById(R.id.plus).setOnClickListener(this);
        findViewById(R.id.minus).setOnClickListener(this);
        setVolumeControlStream(AudioManager.STREAM_MUSIC);
        soundPool = new SoundPool(50, AudioManager.STREAM_MUSIC, 0);
        /** Sound ID for Later handling of sound pool **/
        soundId = soundPool.load(this, R.raw.sounds, 1);
        soundPool.setOnLoadCompleteListener(new OnLoadCompleteListener() {
            @Override
            public void onLoadComplete(SoundPool arg0, int arg1, int arg2) {
                streamId = soundPool.play(soundId, 1, 1, 1, 3, pitch);
                soundPool.setLoop(streamId, -1);
                Log.e("TAG", String.valueOf(streamId));
            }
        });
    }

    int streamId = 0;
    int soundId = -1;
    float pitch = 01f;

    @Override
    public void onClick(View arg0) {
        switch (arg0.getId()) {
        case R.id.minus:
            pitch -= 0.5;
            mtxView.setText("Current Pitch=" + pitch);
            soundPool.setRate(streamId, pitch);
            break;
        case R.id.plus:
            pitch += 0.5;
            mtxView.setText("Current Pitch=" + pitch);
            soundPool.setRate(streamId, pitch);
            break;
        default:
            break;
        }
    }

    @Override
    protected void onDestroy() {
        super.onDestroy();
        try {
            soundPool.pause(streamId);
        } catch (Exception e) {
            e.printStackTrace();
        }
    }
}


Important Points : your file not be bigger than 32 because Android Audio Framework allows only 32 tracks(includes playing/stopped/paused/...) per mixer thread at the same time. If it exceed then you will get error code -12

AudioFlinger could not create track, status: -12
Error creating AudioTrack

Reference Link

Android Developer

Example with source code of Reading call History from android phone


This tutorial teach you to fetch all call from android phone (Outgoing call, Incoming call, Missed Call) with information like call duration, user, call type etc

Because this whole process is very simple so i just make one method to read all call log and save them inside a vector of HasMap.

Android provide CallLog.Calls.CONTENT_URI content provider to read and write about calls. Every attribute has a call name inside data base of call content provider. Read those column and iterate through the loop

This need some permission in android manifest

<uses-permission android:name="android.permission.READ_CONTACTS" />
<uses-permission android:name="android.permission.READ_CALL_LOG" />
<uses-permission android:name="android.permission.WRITE_CALL_LOG" />

Function to read everything about calls

/** Result HasMap **/
    Vector<HashMap<String, Object>> mCallHostory = new Vector<HashMap<String, Object>>();
    private String name = "name", date = "date", duration = "duration",
            isRead = "is_read", type = "type";

    /** Function to read all calls **/

    public void getCallHistory() {
        Cursor cursor = getContentResolver().query(CallLog.Calls.CONTENT_URI,
                null, null, null, null);
        cursor.moveToFirst();
        do {
            HashMap<String, Object> mTemp = new HashMap<String, Object>();
            /* Reading Name */
            String nameTemp = cursor.getString(cursor
                    .getColumnIndex(CallLog.Calls.CACHED_NAME));
            if (name.equalsIgnoreCase(""))
                mTemp.put(name, "Unknown");
            else
                mTemp.put(name, nameTemp);
            /* Reading Date */
            long dateTemp = cursor.getLong(cursor
                    .getColumnIndex(CallLog.Calls.DATE));
            mTemp.put(date, dateTemp);

            /* Reading duration */
            long durationTemp = cursor.getLong(cursor
                    .getColumnIndex(CallLog.Calls.DURATION));
            mTemp.put(duration, durationTemp);

            /* Reading already user see it or not */
            long IS_READ = cursor.getLong(cursor
                    .getColumnIndex(CallLog.Calls.IS_READ));
            mTemp.put(isRead, IS_READ);

            /* Reading Date */
            int typeTemp = cursor.getInt(cursor
                    .getColumnIndex(CallLog.Calls.TYPE));
            mTemp.put(type, typeTemp);

            /* Add one call Detail to Vector */
            mCallHostory.add(mTemp);
        } while (cursor.moveToNext());

        Log.e("Check", "Data");
    }

Reference Link

Android Developer

Thursday 11 July 2013

Applying Custom font in entire android application through XML Layout

Installing custom font in entire application is very easy. We can set any custom font to our whole android application just like a theme. This is very simple procedure and easy to implements.

Requirement of Tutorial

  • Custom Font
  • No minimum SDk version
Basic tools of applying custom font to complete application is to create our own Views and apply font like other XML layout properties

This procedure include few simple steps

1) Create your own application and keep any font file (.ttf) inside assets folder of android project


2) Create one styleable inside your string.xml. This will allow you to set custom font like xml attributes

<!-- FONT FAIIMLY FOR Project -->
 <declare-styleable name="customfont"> <attr name="android:fontFamily"/> <attr name="android:textStyle"/> </declare-styleable>

3) Now create any custom views. Let take one TextView and set our custom font on this.

package com.customfont;

import android.content.Context;
import android.content.res.TypedArray;
import android.graphics.Typeface;
import android.util.AttributeSet;
import android.widget.TextView;

public class CustomText extends TextView {

    public CustomText(Context context, AttributeSet attrs) {
        super(context, attrs);
        init(context, attrs);
    }

    public void init(Context context, AttributeSet attrs) {
        TypedArray a = context.obtainStyledAttributes(attrs,
                R.styleable.customfont);
        String fontFamily = null;
        final int n = a.getIndexCount();
        for (int i = 0; i < n; ++i) {
            int attr = a.getIndex(i);
            if (attr == R.styleable.customfont_android_fontFamily) {
                fontFamily = a.getString(attr);
            }
            a.recycle();
        }
        if (!isInEditMode()) {
            try {
                Typeface tf = Typeface.createFromAsset(
                        getContext().getAssets(), fontFamily);
                setTypeface(tf);
            } catch (Exception e) {
            }
        }
    }
}
Look at the styleable R.styleable.customfont. Its the same name which we declare in step 2

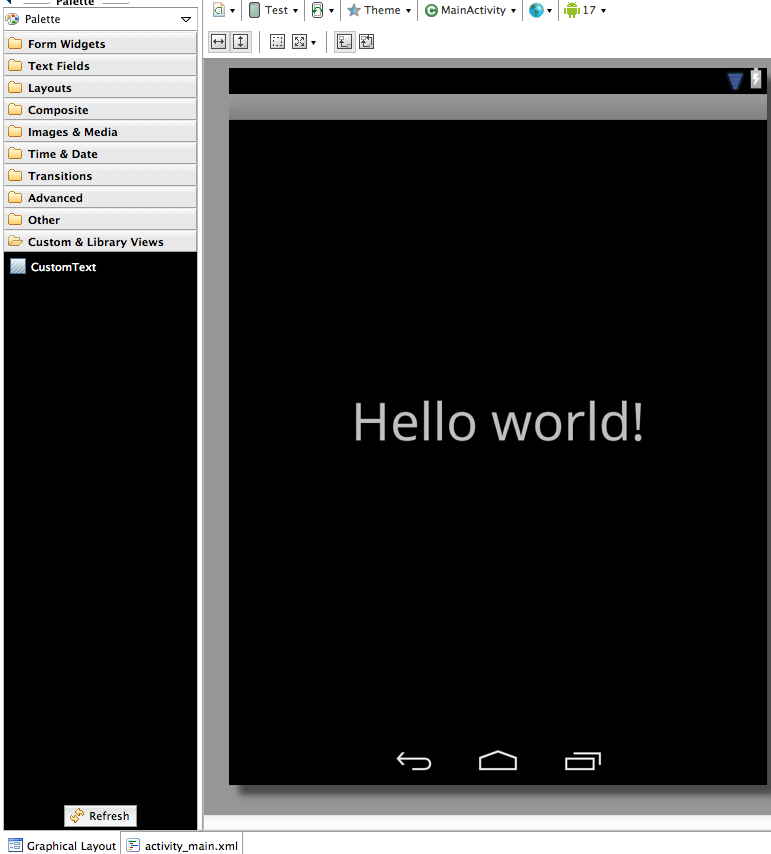
4) Now create one xml layout and use CustomText instead of normal TextView. You can directly use from your graphical layout. See Image


Step 5) Set font name to CustomText inside layout. and Use the same CustomText in entire application. The font will apply through XML layout

   <com.customfont.CustomText
        android:id="@+id/textView1"
        android:layout_width="wrap_content"
        android:layout_height="wrap_content"

android:fontFamily="Forza-Black.otf"

android:text="@string/hello_world" android:textSize="50sp" />

Step 6) After creating a simple Layout. Used this inside Activity and run the Sample


Custom font had applied to your application. See screenshot above. Feel free to download sample application.

Download Sample Application
Android News and source code