Search This Blog

Monday, 22 July 2013

Example with source code of Reading call History from android phone


This tutorial teach you to fetch all call from android phone (Outgoing call, Incoming call, Missed Call) with information like call duration, user, call type etc

Because this whole process is very simple so i just make one method to read all call log and save them inside a vector of HasMap.

Android provide CallLog.Calls.CONTENT_URI content provider to read and write about calls. Every attribute has a call name inside data base of call content provider. Read those column and iterate through the loop

This need some permission in android manifest

<uses-permission android:name="android.permission.READ_CONTACTS" />
<uses-permission android:name="android.permission.READ_CALL_LOG" />
<uses-permission android:name="android.permission.WRITE_CALL_LOG" />

Function to read everything about calls

/** Result HasMap **/
    Vector<HashMap<String, Object>> mCallHostory = new Vector<HashMap<String, Object>>();
    private String name = "name", date = "date", duration = "duration",
            isRead = "is_read", type = "type";

    /** Function to read all calls **/

    public void getCallHistory() {
        Cursor cursor = getContentResolver().query(CallLog.Calls.CONTENT_URI,
                null, null, null, null);
        cursor.moveToFirst();
        do {
            HashMap<String, Object> mTemp = new HashMap<String, Object>();
            /* Reading Name */
            String nameTemp = cursor.getString(cursor
                    .getColumnIndex(CallLog.Calls.CACHED_NAME));
            if (name.equalsIgnoreCase(""))
                mTemp.put(name, "Unknown");
            else
                mTemp.put(name, nameTemp);
            /* Reading Date */
            long dateTemp = cursor.getLong(cursor
                    .getColumnIndex(CallLog.Calls.DATE));
            mTemp.put(date, dateTemp);

            /* Reading duration */
            long durationTemp = cursor.getLong(cursor
                    .getColumnIndex(CallLog.Calls.DURATION));
            mTemp.put(duration, durationTemp);

            /* Reading already user see it or not */
            long IS_READ = cursor.getLong(cursor
                    .getColumnIndex(CallLog.Calls.IS_READ));
            mTemp.put(isRead, IS_READ);

            /* Reading Date */
            int typeTemp = cursor.getInt(cursor
                    .getColumnIndex(CallLog.Calls.TYPE));
            mTemp.put(type, typeTemp);

            /* Add one call Detail to Vector */
            mCallHostory.add(mTemp);
        } while (cursor.moveToNext());

        Log.e("Check", "Data");
    }

Reference Link

Android Developer

Thursday, 11 July 2013

Applying Custom font in entire android application through XML Layout

Installing custom font in entire application is very easy. We can set any custom font to our whole android application just like a theme. This is very simple procedure and easy to implements.

Requirement of Tutorial

  • Custom Font
  • No minimum SDk version
Basic tools of applying custom font to complete application is to create our own Views and apply font like other XML layout properties

This procedure include few simple steps

1) Create your own application and keep any font file (.ttf) inside assets folder of android project


2) Create one styleable inside your string.xml. This will allow you to set custom font like xml attributes

<!-- FONT FAIIMLY FOR Project -->
 <declare-styleable name="customfont"> <attr name="android:fontFamily"/> <attr name="android:textStyle"/> </declare-styleable>

3) Now create any custom views. Let take one TextView and set our custom font on this.

package com.customfont;

import android.content.Context;
import android.content.res.TypedArray;
import android.graphics.Typeface;
import android.util.AttributeSet;
import android.widget.TextView;

public class CustomText extends TextView {

    public CustomText(Context context, AttributeSet attrs) {
        super(context, attrs);
        init(context, attrs);
    }

    public void init(Context context, AttributeSet attrs) {
        TypedArray a = context.obtainStyledAttributes(attrs,
                R.styleable.customfont);
        String fontFamily = null;
        final int n = a.getIndexCount();
        for (int i = 0; i < n; ++i) {
            int attr = a.getIndex(i);
            if (attr == R.styleable.customfont_android_fontFamily) {
                fontFamily = a.getString(attr);
            }
            a.recycle();
        }
        if (!isInEditMode()) {
            try {
                Typeface tf = Typeface.createFromAsset(
                        getContext().getAssets(), fontFamily);
                setTypeface(tf);
            } catch (Exception e) {
            }
        }
    }
}
Look at the styleable R.styleable.customfont. Its the same name which we declare in step 2

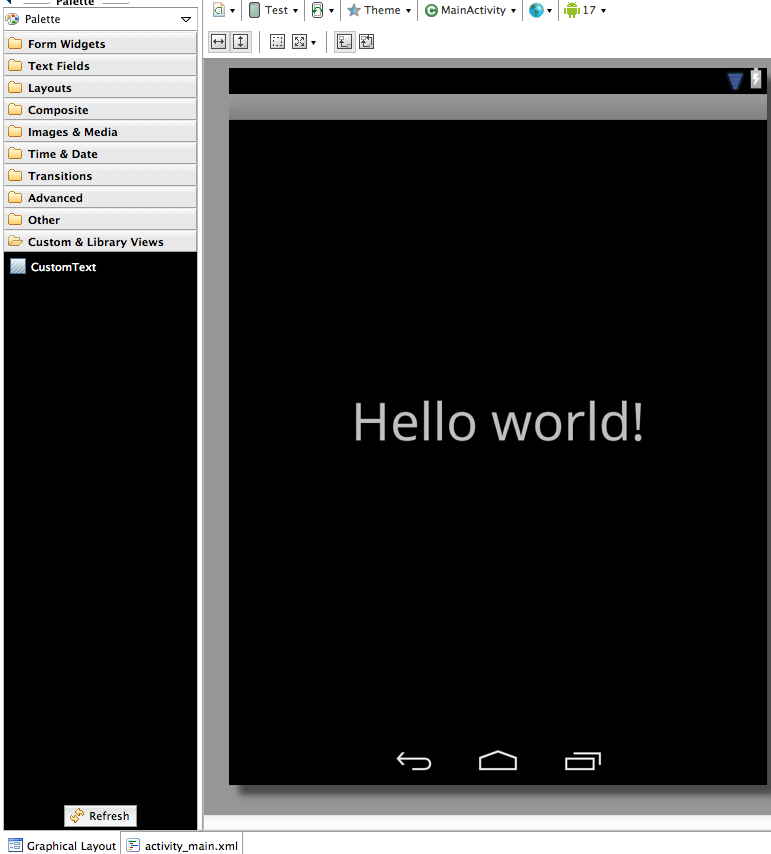
4) Now create one xml layout and use CustomText instead of normal TextView. You can directly use from your graphical layout. See Image


Step 5) Set font name to CustomText inside layout. and Use the same CustomText in entire application. The font will apply through XML layout

   <com.customfont.CustomText
        android:id="@+id/textView1"
        android:layout_width="wrap_content"
        android:layout_height="wrap_content"

android:fontFamily="Forza-Black.otf"

android:text="@string/hello_world" android:textSize="50sp" />

Step 6) After creating a simple Layout. Used this inside Activity and run the Sample


Custom font had applied to your application. See screenshot above. Feel free to download sample application.

Download Sample Application
Android News and source code