Dialog box are powerful tools in android. They have given so much access in dialog box so that we do not need to use spinner. You can create simple Alert Dialog, Custom Alert dialog, Multiple choice, Single choice , Alert Dialog with Base adapter. We easily can create them.
I am going to create All type of dialog boxes with screen shot and source code.
1) Simple Alert Box or Default Alert Box - creating a simple alert dialog is very simple
2) Simple Single Choice Dialog box -
you can create single choice dialog. For this you just need to pass a string array in you dialog box setItem methods
3)Single choice alert box with Radio button - If you want to make single choice box with radio button then change it like that
4) Mulitple Choice Alert Dialog Box - Its some what complicated. For that you need to corresponding array one for values and one for their corresponding slected position . Now when you set select, you have to compare values with selected array
5) Creating custom alert using Adapter - This is awesome way to create dialog with you fully customize view.you can show a complete list view inside a dialog box in android. Here i have taken simple array adapter but you can take complex base adapter here like List View.
In last Dialog we can customize at any level. All though i have posted each method of its own type of dialog but if you have any difficulty then you can download source from latest article Creating Time Picker in android.
Related Article on this Blog
Purely Custom Dialog in android
I am going to create All type of dialog boxes with screen shot and source code.
1) Simple Alert Box or Default Alert Box - creating a simple alert dialog is very simple
   private void SimpleAlert() {
     Builder builder = new AlertDialog.Builder(this);
     builder.setTitle("Simple Alert");
     builder.setMessage("This is simple alert box");
     builder.setPositiveButton("OK", new DialogInterface.OnClickListener() {
       @Override
       public void onClick(DialogInterface dialog, int which) {
         dialog.dismiss();
       }
     });
     AlertDialog alert = builder.create();
     alert.show();
   }
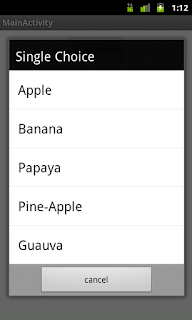
2) Simple Single Choice Dialog box -
you can create single choice dialog. For this you just need to pass a string array in you dialog box setItem methods
   private void SingleChoice() {
     Builder builder = new AlertDialog.Builder(this);
     builder.setTitle("Single Choice");
     builder.setItems(selectFruit, new DialogInterface.OnClickListener() {
       @Override
       public void onClick(DialogInterface dialog, int which) {
         Toast.makeText(MainActivity.this,
             selectFruit[which] + " Selected", Toast.LENGTH_LONG)
             .show();
         dialog.dismiss();
       }
     });
     builder.setNegativeButton("cancel",
         new DialogInterface.OnClickListener() {
           @Override
           public void onClick(DialogInterface dialog, int which) {
             dialog.dismiss();
           }
         });
     AlertDialog alert = builder.create();
     alert.show();
   }
 |
| Single Choice |
3)Single choice alert box with Radio button - If you want to make single choice box with radio button then change it like that
   private void SingleChoiceWithRadioButton() {
     Builder builder = new AlertDialog.Builder(this);
     builder.setTitle("Single Choice With Radio button");
     builder.setSingleChoiceItems(selectFruit, -1,
         new DialogInterface.OnClickListener() {
           @Override
           public void onClick(DialogInterface dialog, int which) {
             Toast.makeText(MainActivity.this,
                 selectFruit[which] + " Selected",
                 Toast.LENGTH_LONG).show();
             dialog.dismiss();
           }
         });
     builder.setNegativeButton("cancel",
         new DialogInterface.OnClickListener() {
           @Override
           public void onClick(DialogInterface dialog, int which) {
             dialog.dismiss();
           }
         });
     AlertDialog alert = builder.create();
     alert.show();
   }
 |
| Single Choice Dialog With Radio Button |
4) Mulitple Choice Alert Dialog Box - Its some what complicated. For that you need to corresponding array one for values and one for their corresponding slected position . Now when you set select, you have to compare values with selected array
 private void MultipleChoiceAlertBox() {
     Builder builder = new AlertDialog.Builder(this);
     builder.setTitle("Multiple Choice");
     builder.setMultiChoiceItems(selectFruit, selectVal,
         new DialogInterface.OnMultiChoiceClickListener() {
           @Override
           public void onClick(DialogInterface dialog, int which,
               boolean isChecked) {
             selectVal[which] = isChecked;
           }
         });
     builder.setPositiveButton("Set", new DialogInterface.OnClickListener() {
       @Override
       public void onClick(DialogInterface dialog, int which) {
         for (int i = 0; i < selectFruit.length; i++) {
           if (selectVal[i]) {
             selectetdVal += "+" + selectFruit[i];
           }
         }
         Toast.makeText(MainActivity.this, selectetdVal,
             Toast.LENGTH_LONG).show();
       }
     });
     builder.setNegativeButton("cancel",
         new DialogInterface.OnClickListener() {
           @Override
           public void onClick(DialogInterface dialog, int which) {
             dialog.dismiss();
           }
         });
     AlertDialog alert = builder.create();
     alert.show();
   }
 |
| Multiple Choice Dialog |
 |
| Select Value |
5) Creating custom alert using Adapter - This is awesome way to create dialog with you fully customize view.you can show a complete list view inside a dialog box in android. Here i have taken simple array adapter but you can take complex base adapter here like List View.
      private void AlertUsingAdapter() {
           Builder builder = new AlertDialog.Builder(this);
           builder.setTitle("Adapter Alert");
           ArrayAdapter<String> arrayAdapter = new ArrayAdapter<String>(this,
                     android.R.layout.simple_list_item_1);
           for (int i = 0; i < selectVal.length; i++) {
                arrayAdapter.add(selectFruit[i]);
           }
           builder.setAdapter(arrayAdapter, new DialogInterface.OnClickListener() {
                @Override
                public void onClick(DialogInterface dialog, int which) {
                     Toast.makeText(AllAlertBoxExample.this, selectFruit[which],
                               Toast.LENGTH_LONG).show();
                }
           });
           builder.setPositiveButton("Cancel",
                     new DialogInterface.OnClickListener() {
                          @Override
                          public void onClick(DialogInterface dialog, int which) {
                               dialog.dismiss();
                          }
                     });
           AlertDialog alert = builder.create();
           alert.show();
      }
 |
| Alert Box with Adapter |
In last Dialog we can customize at any level. All though i have posted each method of its own type of dialog but if you have any difficulty then you can download source from latest article Creating Time Picker in android.
Related Article on this Blog
Purely Custom Dialog in android
Wonderful tuto.
ReplyDeleteYou can improve it a little bit by telling how do you declare selectFruit...
Extremely useful information particularly the last part I care for such information a lot. I was looking for this certain info for a long time. Thank you and best of luck..
ReplyDeletesolavei